Volumes of injection, Needle Length and Gauge
| Volume (mL) | Needle (gauge) | Needle Length (mm) | |
|---|---|---|---|
| Upper extremity joints | |||
| Shoulder | |||
| Glenohumeral joint | 15–20 | 22–23 | 50 |
| Acromioclavicular joint | 1 | 23–25 | 30 |
| Sternoclavicular joint | 1 | 23–25 | 30 |
| Subacromial-subdeltoid bursa | – | 21–23 | 50 |
| Elbow | 5–8 | 22 | 30 |
| Wrist and hand | |||
| Radiocarpal joint | 2–4 | 23–25 | 30 |
| Distal Radioulnar joint | 1–1.5 | 23–25 | 30 |
| Carpal, CMC and IP joints | 0.5–1 | 25 | 15–30 |
| Lower extremity joints | |||
| Sacroiliac joint | 1 | 21 | 80 |
| Hip | 10–15 | 21–23 | 50–100 |
| Knee | 40 | 21 | 50 |
| Ankle and foot | |||
| Tibiotalar joint | 8–10 | 22–23 | 30 |
| Posterior subtalar joint | 2–4 | 22–23 | 30 |
| Sinus tarsi | 3 | 22 | 30 |
| Tarsal, TMT and IP joints | 0.5–1 | 23–25 | 15–30 |
Shoulder
Glenohumeral Joint
Posterior Approach
25 G 1.5" needle
1-7 ml 1% lidocaine
1 ml 40 mg Triamcinolone
Patient sitting with hand touching contralateral shoulder.
Transducer is inferior to the acromion and scapular spine. The transducer is parallel to the scapular spine.
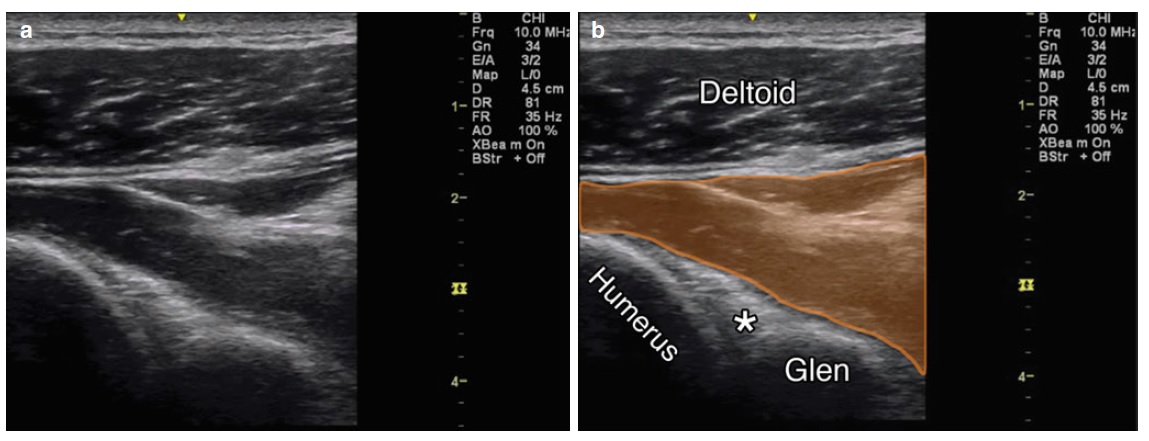
a ) Posterior view of glenohumeral joint. ( b ) View of the posterior glenohumeral joint, deltoid and humerus labeled, Glen glenoid, asterisk indicates labrum, orange overlies infraspinatus muscle
Subacromial Bursa
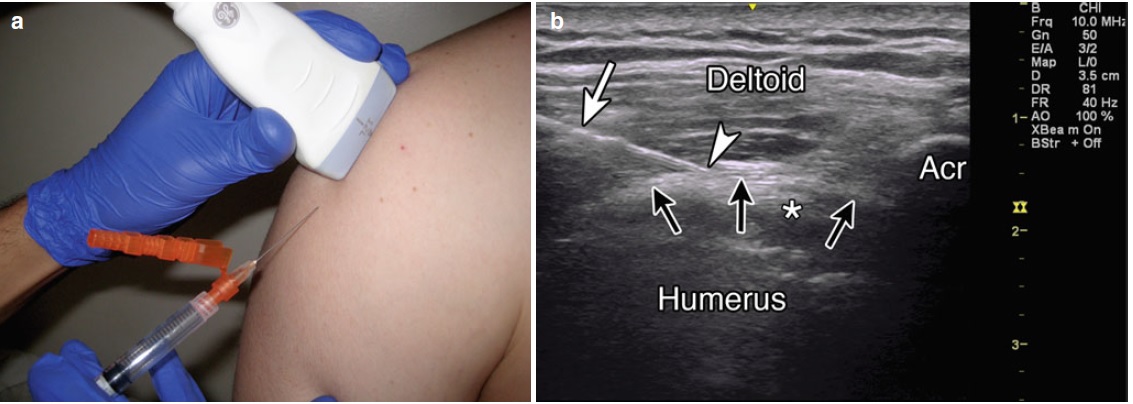
( a ) Example of probe position over SASDB with in-plane injection technique. ( b ) Example of in-plane needle approach, white arrow indicates needle, white arrowhead indicates needle tip, humerus
and deltoid labeled, Acr acromion, black arrows indicate location of SASDB, asterisk indicates supraspinatus muscle with anisotropy.
25 gauge, 1.5″ needle
40 mg of triamcinolone or methylprednisolone
4–6 ml of local anesthetic
Patient supine or sitting upright with hand hanging at the side.
Place the probe in the coronal plane over the lateral end of the acromion perpendicular to the coracoacromial arch.
The bursa is a black line superficial to the supraspinatus tendon.
Elbow


For injection of the elbow the patient is supine with the arm in 90◦ flexion, raised and resting on a cushion. The joint space between the radial head and the capitulum is easily palpated. The hand is pronated or may be turned into the thumb up position, which is necessary to open the joint maximally.
The transducer is placed over the joint visualizing the joint space. The needle (22 gauge, 30 mm) is directed at a slight craniocaudal angle on the dorsolateral side of the joint toward the joint space aiming toward the articular surface of the radial head.
When seen to have entered the joint and upon feeling the cartilage of the radial head, the needle is slightly pulled back to ensure that the bevel is free from the cartilage and facing into the joint.
Wrist
Carpal Tunnel Syndrome
Cross sectional area of the median nerve greater than 0.10 cm2 is indicative of edema in carpal tunnel syndrome.
Pearls:
• The median nerve is subject to anisotropy but not as much as the surrounding tendons. Nerve visualization can be improved by flexing and extending the fingers or wrist or by toggling the probe in the axial plane.
• Tracking the nerve proximally into the forearm may help differentiate it from the palmaris longus tendon.
• An oblique standoff technique may be helpful for small wrists.
• Doppler mode can help identify vascular structures such as a persistent median artery.
Equipment needed:
• High-frequency linear array transducer (10 MHz+)
• 25G 1.5″ needle
• 0.5 mL of steroid preparation
• 1–3 mL local anesthetic
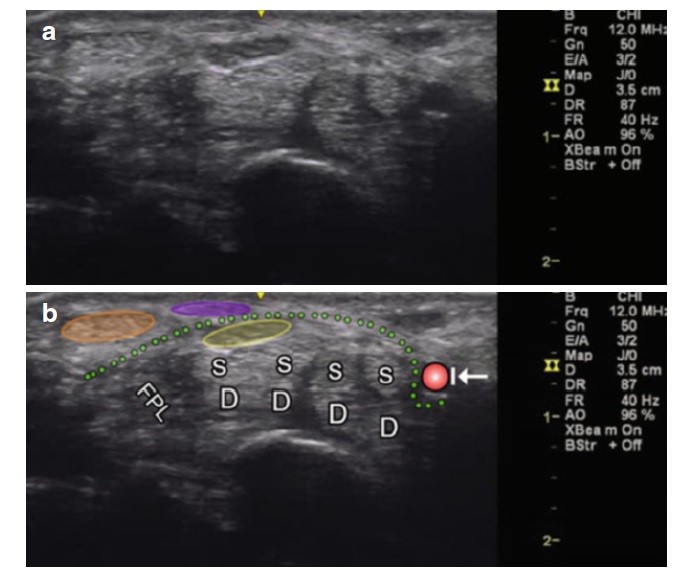
( a ) Axial view of the carpal tunnel. ( b ) Orange oval , flexor carpi radialis; purple oval, palmaris longus; yellow oval, median nerve; FPL flexor pollicis longus; D and S indicate the combined eight tendons of the flexor superficialis and digitorum muscles; arrow with stop indicates ulnar artery; and dotted green line, flexor retinaculum
Distal Radioulnar Joint
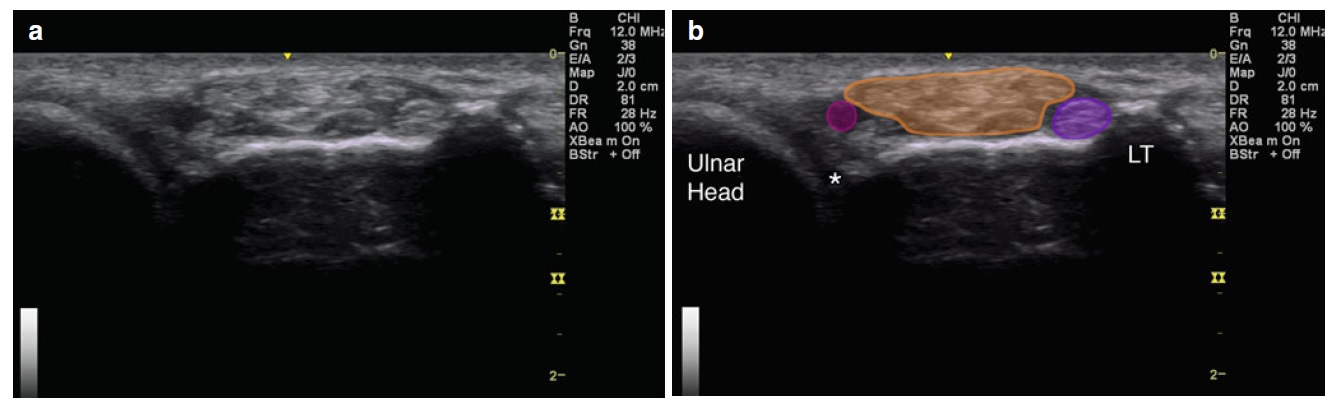
( a ) Axial view over dorsal distal radioulnar joint. ( b ) Asterisk indicates DRUJ; purple circle , third extensor compartment (extensor pollicis longus); orange , fourth extensor compartment (extensor digitorum and extensor indicis); magenta circle , fifth extensor compartment (extensor digiti minimi); LT Lister’s tubercle; and ulnar head labeled

( a ) Example of probe position over DRUJ with gel standoff technique. ( b ) Example of in-plane approach. White arrowhead points to needle tip. White arrow points to needle. Gel-gel standoff, radius, and ulna labeled
Pearls:
• An oblique standoff technique may be used if the ulnar styloid process makes an appropriate needle angle difficult to attain.
• Doppler mode may help identify vascular structures.
• Extending the fingers may help improve identification of local anatomy.
Equipment needed:
• High-frequency linear array transducer (10 MHz+)
• 25G 1.5″ needle
• 0.5 mL of steroid preparation
• 1–3 mL local anesthetic
Radiocarpal joint


The patient is supine with the wrist resting flexed over a 45◦ sponge or a rolled-up towel.
In some cases it may be helpful to hold the wrist in ulnar deviation in order to open the joint space even more.
Carpometacarpal Joint Injection
Sacroiliac Joint
Hip

Iliopsoas Bursal Injection
Knee
Ankle and Foot
Posterior Tibial Tendon Sheath Injection
Tibiotalar joint

For injection of the ankle (tibiotalar joint) the patient is supine with the foot in slight plantar flexion.

The needle, usually 22-gauge (length: 30 mm), is introduced in line with the long imaging axis of the transducer on the medial side of the anterior joint space, medial to the anterior tibial ligament, avoiding ligaments and vessels.
One should identify the talar dome and the overhanging anterior tibial lip. The needle is angled caudo-cranially into the joint under the ventral lip of the distal tibia aiming for the articular surface of the distal tibia.
